Thursday, November 30, 2017

Factum / Fictio

Hello everyone!

Here is an activity I like to use that gives a bit more structure and a different feel to a basic Picture Talk. You could also describe it as a blend of Picture Talk with Dictatio. For more on Picture Talk, I like Chris Stolz's post for beginners. For more on Dictatios, Rachel Ash has a neat post collecting many different variants to use and keep things fresh.

The basic idea is that the disscusion about the picture follows a scripted format. We talk about 'a fact', followed by 'a fiction'. For my purposes, I kept the name of the game in the super simple cognate zone. If you'd rather do something like True/False, or use different terms, please do!

Materials & Setup:
You will need a picture showing multiple vocabulary terms that students can easily identify. They can  already know the terms, or you can introduce the terms during this lesson.
This picture has so much fun stuff going on!
It makes a great Factum / Fictio.
It is especially helpful to have the terms listed somewhere in the classroom (written on another board, on a handout, etc.) The terms I use for the picture above are:

  • habet
  • dat
  • donum tibi habeo!
  • gratias!

Students also need something to write down the facts - for this, I prefer an index card since they probably aren't going to write down more than 8 sentences.

Lastly, the way I have always done this activity is by projecting the picture onto a whiteboard and then drawing onto the whiteboard/picture combo. This type of setup is kind of essential to the activity, but if you come up with another way, I'd love to hear about it!

Running the Activity:

In my classroom, this activity occurs in 'Zona Latina' - so no English is used. Adjust as needed for your and your students' comfort with time in target language.

There are two phases to the activity, and students need to understand them well to be able to play along. The first phase is 'Factum' and the second is 'Fictio'. To make things more clear and more fun, we practice the 'special moves' below.

Factum:
Factum!
  1. Using at least one word from the list of targets, a student suggests one sentence that is clearly in the picture. Option: you can call them to the board to point it out in the picture.
  2. If you approve of the fact, lead students in doing the special move for 'Factum'. This official declares it as a fact. What is the special move? Using a professional announcer-type voice, announce 'Factum!' while pointing toward the sky from a powerful position. This move serves as their signal to write. 
  3. Students write down the fact in Latin. You will repeat it as many times as necessary for them to get it down. They spell as best as they can - the goal of the activity is input!
Fictio!
Fictio:
  1. Using the same word from the list of targets, a student suggests one sentence that is clearly not in the picture, but can be drawn into it. Option: you can call them to the board to draw it themselves or have the official class artist draw it or draw it yourself. 
  2. If you approve of the fiction, lead students in doing the special move for 'Fictio'. This officially declares it as a fiction. What is the special move? Using a jokey or creepy voice, dance like a jester while repeating 'Fictio'. This move serves as their signal to not write.
  3. Instead of writing, students call out encouragement & feedback to the person adding the drawing to the original image, e.g.: 
      • state the 'Fictio' over and over again
      • use positive rejoinders (euge! quam pulchra! ita vero!)
  4. Repeat the cycle by going back to the beginning of 'Factum'.
What students love most about the activity is the end result - the picture filled with both facts and fictions. Here is the picture shown earlier as an example. Hopefully everyone can see the parts that are drawn into it. with the list of sentences below. 

Facts:
persona habet donum.
persona dicit, "donum tibi habeo!" 
persona dat donum. 
persona non dicit, "gratias!"

Fictions:
persona habet lightsabrem.
latrina dicit, "donum tibi habeo!" 
persona dat sellam. 
persona dicit, "gratias!"

I think that covers it. Let me know if you try it out - and if you have multiple sections of a course, a great follow-up activity for the next lesson involves comparing the facts & fictions written by the other classes. Should that appear next on the blog? Thanks for reading. 

Thursday, September 21, 2017

Secret Agent Sketch

Salvēte omnēs!

Here is an activity that I use as a whiteboard game, although the possibilities for what you can do with the pictures are many - I am excited to see if anyone else puts a different spin on it. And my standard disclaimer applies, I can't be sure I didn't borrow this from someone else, but to the best of my recollection, I developed it myself.

So what's this about secret agents? Students, as much as they would like to, don't play the role of the secret agent - hidden letters do. To see what I mean, can you find all the letters of the alphabet hidden in this image?
image credit: http://www.kiddoshelter.com/

This is the kind of drawing students will be creating and inspecting.

Preparation:

This is a low-prep activity, at least the way I use it. All you need are:
  • Student hand-held whiteboards
  • A list of vocabulary words that are easily 'drawable'
It is also helpful to have students sit next to a partner (although they all do their own work), but you can have them move around the room too if that works with your class energy levels.

Procedure:

1. Give students a word to draw - make sure it is spelled out on the board / projector / word wall.
2. Give them 2 minutes to draw a picture of the word (i.e., what the word means).
3. They should also hide 'secret agents' in their sketch - the letters of the Latin word.

example sketch of 'videt' (sees)
Can you find all the letters?
4. When the 2 minutes is up, students switch whiteboards with the partner.
5. Students then try to find the letters of the word in order in their partner's sketch, circling them as they go.
6. Lastly, they review the letters & meaning with the partner before switching back their boards for the next word.

I hope this is a helpful tool! I find it pretty great as second activity to do with new vocabulary, especially if you limit yourself to 3 or 4 words. Let me know if you try anything different with it.

Thursday, September 7, 2017

A Twist On New Classical Standards

Salvēte omnēs!

Don't let today's title fool you! Although I am deeply grateful for the work done on the New Standards for Classical Language Learning (which you can check out on the ACL's page here), our topic today is more of a construction project.

First, the story. A few years ago, I came across the idea of rejoinders (hat tip Bryce Hedstrom & Grant Boulanger), and had already incorporated the idea of staying within the target language in my classroom. When class was expected to 'stay in Latin', I simply flipped the 'zona Latina' sign seen at right, which was held by magnet to my whiteboard. As I started thinking about including rejoinders, I was pretty low on board/display space in my classroom. And I knew from stuffed animals/circling with balls/props that students loved to hold things. This led me to thinking about signs that didn't go on the wall - it led me to thinking about hand-held signs, like Roman military standards. It took me a bit of trial and error, but I came up with a quick and relatively painless way to construct something that works.

Here's what you will need to make your own:

  • A wooden yard stick
  • packing/moving tape
  • the front flap of a 3-ring binder
    • N.B. - you will specifically need the kind that has a plastic film around the outside which creates a pocket on the front of the flap
    • my teaching partner and I collect student binders at the end of the year to reuse them for ourselves, so all my standards are made from binder flaps that would otherwise have been trash!
  • scissors/box cutter
  • an large, old cardboard box (optional)
    • I use this as a workstation to protect myself and the floor from the box cutter and the packing tape

Here's the construction process:

1. First, center the yardstick on the back of the binder flap, ensuring that the top of the stick is flush with the top of the flap.

2. Now attach the stick to the flap using a serious amount of tape. First, tape vertically along the sides of the yardstick, trying to keep the tape flush with the sides of the yardstick.


3. Next, tape in rows, starting from the top, and maximize the surface area in contact with the tape.


4. Cut the tape along the edges of the binder flap.

5. Test your standard by holding it in the air, waving it, trying to wiggle the binder flap. Drop it in an accidental way to make sure it is sturdy.

6. Slide a printout or something into the front pocket of the binder flap so it is visibile when the standard is displayed. Now it is ready to use! 


And a final note - once you start making these, your students will want more of them.

We store our standards in a 'milk crate' with file slots.


Monday, July 24, 2017

Brain Break: Paper Cup Columns

Hello again!

Today's post is a quick one. It works both as a Brain Break and as a more standard lesson-type activity, depending on how you use it. It's fun and engaging. Plus, as a bonus - it incorporates a buzzword from the past few years of education - STEAM. For more info on Brain Breaks, see my previous post about the Sticky Step. For more information on STEAM, check out this short page on STEAM Basics.

Preparation: You will need some specific materials, and students assigned to groups (or maybe partners if necessary)
Stacking the Cups
  • Paper Dixie Cups (5 oz. size) - 15 per group
  • Scissors - 2/3 pairs per group
  • Students will also need prior knowledge about the three major classical orders or an explainer sheet (see picture at right)

Goal of the Activity:
Build 3 columns, one Doric, one Ionic, and one Corinthian.

Sample Columns
A majestic Corinthian column
A simple, free-standing Doric column

Victory criteria: 
  • The different capitals on the columns must demonstrate knowledge of their features.
  • Each column must be 5 cups tall.
  • Each column must be free-standing.

Some notes:
  • The first time students do this activity, they will probably find it difficult.
  •  many of STEAM or STEM activities, you can run it as a
    • race (first team to finish wins!)
    • challenge (every team that completes the activity wins!) 
  • You can increase the difficulty of the activity by adding to the height of each column. 
  • If you use it as a Brain Break, you can recycle the cups!
  • If, by chance, you used paper cups with the Solo Jazz design, that would be the bomb. :-)
classic, but not classical, cups from the ’90s

Monday, July 3, 2017

ACL Institute Recap

Salvēte omnēs!

Mea culpa! I didn't mean to be gone so long. And while I could spend a bunch of words discussing the reason for my lengthy, and certainly unintended, hiatus, I'm going to just jump right back in. In particular, today's post is about the 2017 American Classical League Institute at Grand Valley State University.

I've often been told and shown that good teachers, after something has ended, reflect upon it. This has been emphasized by Charlotte Danielson's Framework for Teaching, by administrators who take stock of everyone's ideas before officially closing a meeting, by colleagues who model reflective blogging, among many other examples. And while I could write a quick summary of ideas and tips from presentations, instead I'd like to focus my reflection on one big takeaway from the past two Summer Institutes:


Because as great as the tips, pedagogical ideas, new readings of literature, lesson plans, and tech tools shared during the scheduled sessions are, I am confident that most people's experience of ACL Institute can be pretty accurately described by the above quote.

When I think about my friends who have been attending each year since before I was even an adult, they don't come back to hear their friends speak again, or watch their friends navigate an unfamiliar campus, they come back to feel as good as they did the last time they were together.

When I think about the meritus/merita honorees, they almost always speak about the people who made them feel good and tell stories of the good times. They usually skip a greatest hits list of presentations they've attended or accomplishments they've valued the most.

When I think about the teachers who attended for the first time, they want the professional development, but they also crave the connection and want to feel it again.

When I think about what people take away from the Teaching Materials Exhibits, they may have books in their hands and ideas in their heads, but the positive vibes of the people in the physical space are what make shopping there better than Amazon.

When I think about mentorship and supporting teachers, especially as the overall ACL as well as its sub-organizations have dedicated increasing effort to the cause, I realize the problem is an adaptive challenge. Technical solutions can only help so much, because the emotional well-being of other humans cannot be implemented by edict. The complex interactions, fostering of relationships, and most importantly, the people with the problem (those who need mentoring) being a part of the work solving it.

At this year's Institute, I spent countless hours listening to others, but comparatively very few listening to presentations. I purposely spoke person-to-person with so many people, in an effort to make sure they felt heard. And I will tell you, that, although I took notes on many of these chats, I don't remember exactly everything they said or did. I made my best go at speaking with purpose, to ensure a connection of ideas. And I remember feeling awesome about these conversations!

So, if you attended ACL Institute, I hope the time with colleagues fueled your fire, enriched your soul, and brought you joy. If you are going to return in the future, I hope you know what to look forward to. And if you are going to attend for the first time soon, I'll see you there, and afterward we can remember together how much we enjoyed it.

Saturday, March 4, 2017

Brain Break: Sticky Step

Hello again!

Today's post is a quick one - it's just about a single Brain Break. Brain Breaks are an awesome classroom management tool that can provide all kinds of wonderful things - a switch from sedentary mode into something physical, a way to transition from one type of activity to another, a chance to adjust the mood of the class in any direction, just to name a few. If you're interested in the topic, check out what the super Martina Bex wrote about them here, and dig even deeper into her references for other sources of inspiration.

Here's how the Sticky Step works:

Preparation:
1. Students need to have a 'used' sticky note (Post-It Note) that they will not need anymore. Rather than simply throw it away, put it on someone's back, or have it get stuffed in the bottom of a pencil pouch, we'll use it one last time.
The Activity:
Step 1:
Attach sticky note to the bottom of one foot, but in a way that only half the sticky is under your foot. The other half peeks out between your feet.

Step 2:
Try to transfer the sticky note back and forth between your feet by simply stepping from one foot to the other. Each time you transfer, lift the sticky off the ground.

Step 3:
Count each lift.

Here's a quick video demonstration:


Sometimes students just enjoy a brain break because it is a change of pace. Other times, they need a way to measure or compete. If that's the case, I use two different ways to frame the competition:

  1. Count how many steps you can get in 10 seconds.
  2. Count how many steps you can get before the sticky note gives up.

With these, I don't declare winners for the class or anything. It's simply to encourage students to try their own personal best.

Some notes:
  • Students will try to switch feet without lifting, which takes away an accurate count and some of the challenge.
  • Students will try to 'cheat' by standing both feet on the sticky at the same time.
  • Students will also try to use their hands.
Unlike a lot of Brain Breaks, this one does require some prior planning as far as classroom materials. It is a little easier for me to incorporate in my classroom because we use sticky notes (Post-It Notes) a lot and students generally have one on their desk or in their binder from a previous warm-up or temporary note-taking activity. I have a post coming in the future about all that sticky noting.

Thursday, January 26, 2017

Resources & Variants: Surrender On Six

Salvēte omnēs!

Today's post introduces an ongoing series that I think many in the blogging community will appreciate. I'm calling it 'Resources & Variants', or 'R&V' for short. These posts will take another look at an activity or idea that can be found on someone else's blog and offer up something to make it easier for a teacher to implement in their classroom (resources), and provide options to help fit the activity with your class or help keep things interesting when returning to the activity over and over (variants).

So, the awesome activity on the docket today is 'Surrender on Six', which Keith Toda learned from  two other teachers at his school, including Pomegranate Beginnings' Miriam Patrick. If you aren't familiar with it or want a refresh, here's Keith's original post:
http://todallycomprehensiblelatin.blogspot.com/2016/01/the-sex-game.html

Resources:
The resources I have to share with you are pretty simple, but anything helps, right? The first one is for students to use, and the second is for you as the teacher to set up the activity effectively.

First, if your students have access to technology, you can have them 'roll the die' using this handy feature from random.org. I am fortunate that my students have access to laptops every day, and I like using this type of rolling for the activity, for a few reasons:

  1. It makes easier for me to supervise - you can read the roll from across the room instead of having to be perched over the top of a group's table. 
  2. It prevents students from doing things with the die that you'd rather they not do. Things like try to cheat the roll, keep it away from another student, roll it onto the floor each time, etc. Manipulatives are great, but experienced teachers know that sometimes they can cause issues that aren't really worth it. In my opinion, this is one of those times.
  3. You can assign responsible students to be the 'roller' who clicks the button each time. Each group will need 2 'rollers', a primary and a backup (for when the primary is busying writing!) A single person clicking goes much quicker than a group of people rolling a physical die, so it really speeds things up!
Next up:
Follow this link to get a template for creating the answer sheets students use during the activity. Hopefully the directions below will help you print them easily! 😄

First, highlight all the cells on the sheet:


Now click File > Print.


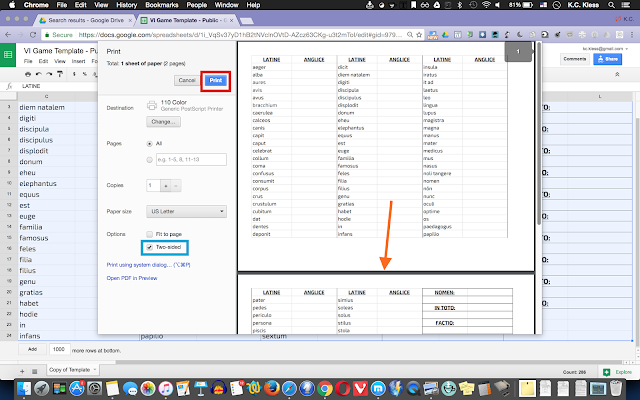
Set your Print Settings like this:
  • Options: Selection
  • Layout: Actual Size & Landscape
  • None of the boxes checked

Then click the blue Print button on the lower left (highlighted in red).

Now you've got a screen that looks like this:

You should see something that has a page break (like where the orange arrow points).

Check the box for 'Two-sided'.

Click the blue Print button at the top.

This will print out double-sided sheets with your entire answer document. Yeah!


I've included 3 styles of answer sheet. You can choose the one you want using the tabs at the bottom:

  1. A simple vocabulary-only template. 
  2. A template to play 'sentence-style' as Keith describes as his post-reading CI-variant. 
  3. A template with an in-line place to keep track of points. I use this one for a variant on Keith's variant. Variant, you say? Sure! Let's move on to that section of the post, where you can find little twists to keep your students on their toes. 

Variants:

Bonus Point Scoring Variant:
This is the slight twist on Keith's CI variant, where each word in a sentence is worth a point. I created it as an incentive for students to try entire sentences and as a way to add bonus points to the activity, since everyone loves bonus points more than regular points. 😋 Each word in a sentence is still worth 1 point, but a complete sentence is worth a bonus point! 

Rainbow Rounds:
I really like to do this format. I will set a timer for a period of 7 to 10 mintues and the students compete using a specific colored marker. I have a pretty substantial number and variety of Sharpies in my classroom, including more fine and ultra fine tips than any one person should own, so I will hand a red marker to each team for the first round, the 'Red Round'. The second round could be 'Orange Round', etc. Using this format, we can usually play 3 to 4 rounds per class period and declare winners within each group, plus a winning group for each round, plus an overall winning student, plus an overall winning group. At the end, the papers look beautiful.

Other awesome of Rainbow Rounds:
  • When I review the sheets, I learn a lot about what is easy for students and what is not. Those things that are the easiest will come earlier in the rainbow, and you can see patterns where students skip over things, leaving them as some of the few things left to answer toward the end of the rainbow. 
  • Chunking the class period into rounds allows you to add some flexibility to your lesson. If you need to work with a small group of students, or an individual student, they can sit out for one round, get the time or assistance they need, and still get a chance to play the other rounds. 
111:
This variant involves the team keeping track of the rolls a little bit, so it is best played once your students know the game well. If three consecutive students roll a '1', all three students get to write one thing before passing the writing utensil/magic marker back to the person who earned it with the '6' roll. So if you're playing 'sentence-style', that means they write one sentence apiece, if you're playing vocabulary words alone, that means they write one definition apiece.

Numerus Bestiae: 
Caveat - This one may not be for everyone. Knowing your students, parents, school, administrators, and community is an important part of creating a micro-culture of learning within your classroom that fits into the greater culture. Just like the previous variant, it involves students keeping track of the consecutive rolls. If three consecutive students roll a '6', the entire group shouts, 'Numerus Bestiae!' in their most evil voices (because 666 is the number of the beast). Then you, as the teacher, do something evil. You declare that all Latin words containing the letters 's' 'e' & 'x' do not count for this round and students resume playing. Depending on what Latin is in your activity that day, that could be a lot of the words! In addition to thinking about the first caveat with this variant, I would double-check my word/sentence list to make sure the activity is still feasible after removing those words. 

Connect Four:
Yes indeed, another one with numbers, but this time there's no tracking of rolls. Instead, students are rewarded for getting consecutive lines on the answer sheet correct. If a student correctly answers four lines in a row, they earn a bonus point. To see how that works, take a look at this example:

 
You will see that you begin counting from the top of a column. You cannot connect four across the columns. 
This answer sheet would earn a bonus for laetus - lupus and magistra - mater. Notice how once a word counts in one group of four, it does not count in another. In other words, even though the four answers from leo through magistra are correct, the groups of four can't overlap and those connections won't count. 

Wrapping Up:

Feedback, feedback, feedback! Hopefully this kind of post is useful. If it is, please let me know via social media or the comments. I do plan on repeating this format with other CI activities in the future, so if you have suggestions for which activities would be good for a second look, shoot those my way too. 

Sunday, January 8, 2017

Write or Wait

'Write or Wait' is a listening and writing activity to use with students when reading new material with them. It is useful as a substitute for a traditional Dictatio, a topic that Rachel Ash wrote about earlier this week. I like to think of this activity as a cross between ‘Read, Discuss, & Draw’ and a Dictatio. It isn’t precisely, but it has the feature of a Dictatio where you’re asking students to listen and write without seeing the Latin. It also reminds me of ‘Read, Discuss, & Draw’ in that the way the lesson flows with class involves a big allowance for the ‘Discuss’ portion - where the teacher clarifies meaning, uses circling techniques, perhaps calls up actors, and ensures that students understand before moving on. And if you regularly use embedded readings, the sweet spot for this activity is probably with the Tier 2 reading. 

Before we get to the good stuff, the usual ‘Scrambled Eggs’ caveat applies - I think I created this activity, but if not, please direct me to the originator so I can give them credit. If you’re not sure what I’m referring to, you can read up on what went through Paul McCartney’s mind when he first played “Yesterday” here. In any case, I can’t shake the feeling that I’ve gotten this activity from someone else, so speak up if you can help out. 

The basic idea is that the students have a choice to write or wait. 
  1. If a student has chosen write, they will try to write the entire sentence in Latin as you read it out loud. 
  2. If a student has chosen to wait, they cannot write until after you’ve written the sentence yourself. 
Preparation:
  1. You need a short piece of story (between 5-10 sentences is a good amount) that students haven’t read before. The activity really doesn’t work as well with seen material. I will explain why in a bit. 
  2. You also need the ability to write or project the story ‘live’. I typically use a blank Google Document for this with the font enlarged. But I think this activity could work with old-fashioned writing on the board if you have enough space. 
  3. Print that short piece of a story out so you have a copy to read for yourself.
  4. ***Spice Alert***🌶🌶🌶 To keep things interesting, I use stickers to give to the students that represent their two options - Write or Wait. I really prefer stickers that come in rolls rather than sheets for this. But before you pick some stickers, you will need to think about how to deploy them: 
    1. You can give them blank stickers of 2 different colors (like these) and have them add the words ‘write’ or ‘wait.' 
    2. You can give them blank colorful ones and then use a ‘fun’ type of sticker for the second option. Disclaimer - this is my preference.
    3. You can give them 2 different fun stickers, like these. The difficulty here can be for students to remember which sticker is which. 
  5. Decide how many of each option you want to give students. If you have  6 sentences, you can give 3 writes and 3 waits. Or 2 and 4. Or 4 and 2. Giving numbers that are far from equal, like 5 writes and just 1 wait, takes a bunch of the fun and, according to students, a bunch of fairness, out of the game.

Gameplay:
  1. Students will need standard writing stuff in your classroom - pencil/pen, notebook paper/large index cards. 
  2. Hand out the stickers.
  3. Give students the special instructions for the stickers (e.g. write ‘wait’ on the red stickers, and leave the smiley face stickers alone).
  4. Have the projector at the ready, and have the students number the first sentence #1. Then ask ‘Write or Wait?’. Give students 10 seconds to decide and place their stickers on their papers, right next to the #1.
  5. Read the sentence out loud (Don’t put it on the board yet!) one time, at a moderately slow pace. It should be fast enough that there will be some mistakes but not so fast that no student in the class will get every word. N.B.: This takes some practice to pace it well. 
  6. Pause long enough to make sure all students have stopped writing.
  7. Now repeat the sentence out loud as you put it on the board. I love typing it, and have the good fortune of a technology setup that allows me to do that easily. You can make it work writing on the board too, though, so technology isn’t absolutely essential for this lesson. Good to remember when your school’s WiFi glitches out!
  8. Do your normal classroom procedure for clarifying meaning and confirming that students understand before you move on. In my class, that means students' to ask 'Quid significat?' questions. When they understand and want to move on, they use a thumbs-up or the ASL sign for 'all done’
  9. Repeat steps 4 through 8. 

Notes: 
  • Once students get into it, they will often celebrate or bemoan their choice to write or wait. This is good. This activity should produce high engagement from students - it taps into 5 of the 8 C’s of Engagement: Competition, Challenge, Curiosity, Controversy, and Choice. Here’s a quick summary of the C’s from Harvey Silver at the Thoughtful Classroom, and here’s a longer explanation if you’d like to become more familiar with them.
  • As for the idea of Choice, I absolutely love activities based on choosing one of two. The students get the benefit of a choice, and if you structure it correctly, they feel like that choice matters. In this activity, it gives them a sense of control over what they are assigned to do and allows them to shape their experience during the lesson. But you avoid many of the problems that come with giving students unlimited choice or a choice they have to persevere through even if they discover it isn’t a good one. 
  • If you’re planning on asking students a story while typing it up in front of them, as Bob Patrick describes here, this is a great way to scaffold some of the skills they will need for that kind of lesson. 
Thanks for reading!🌶🌶🌶

Tuesday, January 3, 2017

Felicem Diem Natalem!

Salvete omnes! 

Welcome to my brand new blog home for 2017. I am looking forward to sharing many things with you this year, hopefully every few weeks. 

First, today’s post isn’t much of a post about teaching or learning. I wanted to start the blog today because January 3rd is the birthday of Marcus Tullius Cicero, and, well, my blog does include his name. I have chosen to do this because in the minds of many, he is the pinnacle of Latin. He was also a novus homo, a relative newcomer to the long tradition of Roman politics. I love that duality because as I appreciate the ancient world and have a reverence for history and tradition at times, I also believe in change and the search for new and better ways of doing things. But that ancient and famous Cicero, representing Latin & Classical culture, is only one part of this blog. 

In addition, this blog will be about Comprehensible Input. I believe in what CI can do for all students, and I see ways that learning about it can benefit all teachers (even teachers of subjects besides language). I have taken from the wonderful online community of teachers who have shared much about CI, and I feel it is my time to give back in the best way that I know how. So, I will ‘cover’ the topic of CI (cerō “I cover with wax” + CI) on this blog, especially as it pertains to my own Latin classroom.  

With that all said, be on the lookout for a lengthier post later this week. :-)